本文最后更新于 2025年10月30日 下午
环境
java版本:1.8.0_144
SpringBoot版本:2.3.12.RELEASE
申请TelegramBot
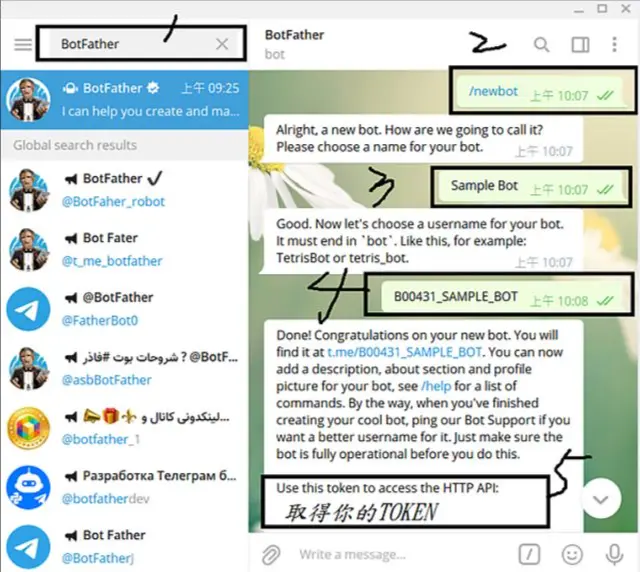
在telegram中搜索BotFather,并按图中步骤申请,其中第三步的机器人用户名和第五步token我们后面需要用到
创建完成后,就可以搜索第四步的机器人名称搜索到创建的机器人了
SpringBoot整合
1.pom.xml引入telegrambots
1
2
3
4
5
6
|
<dependency>
<groupId>org.telegram</groupId>
<artifactId>telegrambots</artifactId>
<version>6.5.0</version>
</dependency>
|
2.项目配置文件application.yml增加配置
1
2
3
4
5
6
7
| telegrambot:
username: 机器人用户名
token: 创建机器人获得的token
chatId: 对话id(可先不填)
|
3.创建对应的TelegramBotConfig类
1
2
3
4
5
6
7
8
9
10
11
12
13
14
15
16
17
18
19
20
21
22
23
24
25
26
27
28
|
@Configuration
@ConfigurationProperties("telegrambot")
@Data
@Slf4j
public class TelegramBotConfig {
private String username;
private String token;
private String chatId;
private String proxyHost;
private String proxyPort;
@Bean
public DefaultBotOptions defaultBotOptions() {
DefaultBotOptions botOptions = new DefaultBotOptions();
if (StringUtils.isNotBlank(proxyHost) && StringUtils.isNotBlank(proxyPort)) {
botOptions.setProxyHost(proxyHost);
botOptions.setProxyPort(Integer.parseInt(proxyPort));
botOptions.setProxyType(DefaultBotOptions.ProxyType.SOCKS5);
}
return botOptions;
}
}
|
4.创建TelegramBot类继承TelegramLongPollingBot
1
2
3
4
5
6
7
8
9
10
11
12
13
14
15
16
17
18
19
20
21
22
23
24
25
26
27
28
29
30
31
32
33
34
35
36
37
38
39
40
41
42
43
44
45
46
47
48
49
50
51
52
53
54
55
56
57
|
@Slf4j
@Component
public class TelegramBot extends TelegramLongPollingBot {
@Resource
private TelegramBotConfig telegramBotConfig;
public TelegramBot(DefaultBotOptions options) {
super(options);
}
public void sendMarkdownMsg(String markdownMsg) {
SendMessage message = new SendMessage();
message.setParseMode(ParseMode.MARKDOWN);
message.setChatId(telegramBotConfig.getChatId());
message.setText(markdownMsg);
try {
execute(message);
} catch (Exception e) {
log.error(e.getMessage(), e);
}
}
@Override
public void onUpdateReceived(Update update) {
log.info("TelegramBot onUpdateReceived update:{}", JSON.toJSONString(update));
if (update.hasMessage() && update.getMessage().hasText()) {
SendMessage message = new SendMessage();
message.setChatId(update.getMessage().getChatId().toString());
message.setText(update.getMessage().getText());
try {
execute(message);
} catch (Exception e) {
log.error(e.getMessage(), e);
}
}
}
@Override
public String getBotUsername() {
return telegramBotConfig.getUsername();
}
@Override
public String getBotToken() {
return telegramBotConfig.getToken();
}
}
|
5.创建TelegramBotInit初始化TelegramBot
1
2
3
4
5
6
7
8
9
10
11
12
13
14
15
16
17
18
19
20
21
22
23
|
@Component
@Slf4j
public class TelegramBotInit implements CommandLineRunner {
@Resource
private TelegramBot telegramBot;
@Override
public void run(String... args) {
try {
TelegramBotsApi botsApi = new TelegramBotsApi(DefaultBotSession.class);
botsApi.registerBot(telegramBot);
} catch (Exception e) {
log.error(e.getMessage(), e);
}
log.info("TelegramBot register success!");
}
}
|
6.测试onUpdateReceived方法,并获取chatId 我们给机器人发消息,并查看控制台日志,获取chatId

当我们想用机器人给自己做一些定时通知时,就可以在配置文件填入chatId,然后使用TelegramBot类的sendMarkdownMsg方法即可
官方文档:
Bot API Library Examples
Home · rubenlagus/TelegramBots Wiki